News
The Art of Rolling a Joint: 7 Tips for Newbie Cannabis Users
As the legalization of cannabis continues to spread across the United States and the world, more and more people are beginning to explore the plant for recreational and medicinal use. One of the most popular ways to consume cannabis is by rolling a joint, but for those who are new to the practice, the task can be a bit daunting. Rolling a joint is an art form, requiring patience, practice, and the right technique. Here are seven tips to help newbie cannabis users master the art of rolling a joint.
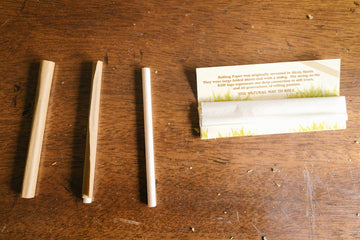
1. Gather Your Supplies
Before you can begin rolling a joint, you’ll need to gather the necessary supplies, which include rolling papers, cannabis, and a grinder. Rolling papers come in a variety of sizes, shapes, and materials, so you can choose the one that best suits your needs. Cannabis should be ground up before rolling, so a grinder is an essential tool. You may also want to have a filter tip or crutch on hand to help keep the joint from becoming too clogged.
2. Grind Your Cannabis
Once you’ve gathered your supplies, you can begin grinding up your cannabis. Using a grinder will help ensure that the cannabis is ground to the right consistency for rolling. If you don’t have a grinder, you can use a pair of scissors to finely chop up the cannabis. You’ll want to make sure that the cannabis is evenly ground so that it will burn evenly when smoked.
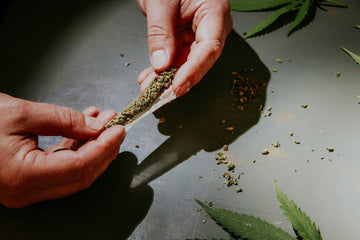
3. Prepare the Joint
Once the cannabis is ground, you can begin preparing the joint. Start by taking a rolling paper and folding it lengthwise. Next, sprinkle the ground cannabis evenly across the center of the paper. You’ll want to make sure that the cannabis is spread out evenly across the paper, so that the joint will burn evenly.
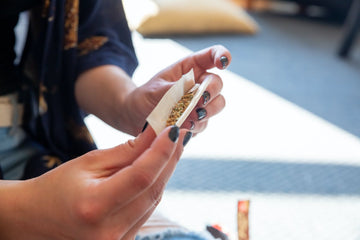
4. Roll the Joint
Now it’s time to start rolling the joint. Start by grabbing the edge of the paper closest to you and rolling it forward and up, tucking the edge of the paper into the center of the joint. Then, continue to roll the joint until it is completely enclosed. Once the joint is rolled, use your fingertips to lightly press down on the edges of the paper to help secure the shape of the joint.
5. Add the Filter Tip
If you’ve chosen to use a filter tip or crutch, now is the time to add it. Simply insert the filter tip into the end of the joint, making sure that it is tucked in securely. This will help keep the cannabis from falling out when the joint is smoked and will also help keep the joint from becoming too clogged.
6. Twist the Top
Once the filter tip is in place, you’ll want to twist the top of the joint. This will help keep the cannabis from spilling out and will also help give the joint a more aesthetically pleasing appearance.
7. Enjoy Your Joint
Once you’ve finished rolling your joint, all that’s left to do is light it up and enjoy! Rolling a joint takes some practice, but with a bit of patience and the right technique, you’ll soon be a pro.
Rolling a joint is an art form, and mastering the technique takes practice. With these seven tips, however, newbie cannabis users can easily learn the skill and start enjoying the benefits of cannabis. Whether you’re a recreational user or are using cannabis for medicinal purposes, rolling a joint is a great way to enjoy the plant.
1. Gather Your Supplies
Before you can begin rolling a joint, you’ll need to gather the necessary supplies, which include rolling papers, cannabis, and a grinder. Rolling papers come in a variety of sizes, shapes, and materials, so you can choose the one that best suits your needs. Cannabis should be ground up before rolling, so a grinder is an essential tool. You may also want to have a filter tip or crutch on hand to help keep the joint from becoming too clogged.
2. Grind Your Cannabis
Once you’ve gathered your supplies, you can begin grinding up your cannabis. Using a grinder will help ensure that the cannabis is ground to the right consistency for rolling. If you don’t have a grinder, you can use a pair of scissors to finely chop up the cannabis. You’ll want to make sure that the cannabis is evenly ground so that it will burn evenly when smoked.
3. Prepare the Joint
Once the cannabis is ground, you can begin preparing the joint. Start by taking a rolling paper and folding it lengthwise. Next, sprinkle the ground cannabis evenly across the center of the paper. You’ll want to make sure that the cannabis is spread out evenly across the paper, so that the joint will burn evenly.
4. Roll the Joint
Now it’s time to start rolling the joint. Start by grabbing the edge of the paper closest to you and rolling it forward and up, tucking the edge of the paper into the center of the joint. Then, continue to roll the joint until it is completely enclosed. Once the joint is rolled, use your fingertips to lightly press down on the edges of the paper to help secure the shape of the joint.
5. Add the Filter Tip
If you’ve chosen to use a filter tip or crutch, now is the time to add it. Simply insert the filter tip into the end of the joint, making sure that it is tucked in securely. This will help keep the cannabis from falling out when the joint is smoked and will also help keep the joint from becoming too clogged.
6. Twist the Top
Once the filter tip is in place, you’ll want to twist the top of the joint. This will help keep the cannabis from spilling out and will also help give the joint a more aesthetically pleasing appearance.
7. Enjoy Your Joint
Once you’ve finished rolling your joint, all that’s left to do is light it up and enjoy! Rolling a joint takes some practice, but with a bit of patience and the right technique, you’ll soon be a pro.
Rolling a joint is an art form, and mastering the technique takes practice. With these seven tips, however, newbie cannabis users can easily learn the skill and start enjoying the benefits of cannabis. Whether you’re a recreational user or are using cannabis for medicinal purposes, rolling a joint is a great way to enjoy the plant.